How to Connect a Turntable to a Receiver Without a Phono Input?
If you’ve got a turntable and want to play it through a modern receiver, you might run into a few challenges.
After the mid-1980s, many amplifiers no longer have a phono input, which is necessary for turntables.
But don’t worry—there are some simple tips to get your vinyl running smoothly.
Let’s dive into how you can make this setup work, whether you have a modern or vintage turntable.
Why Is a Phono Input Important for Turntables?
A phono input is a special connection on a receiver or amplifier made for turntables. It boosts the tiny signal from the turntable and adjusts the sound so that your music comes out clear and balanced, with proper bass and treble.
You see, the signal coming from a turntable is incredibly weak—about 1,000 times weaker than the signal from, say, a CD player or streaming device. That’s because the tiny electrical currents produced by the turntable’s cartridge need to be amplified. This is where the phono input steps in.
If you were to plug your turntable into a regular input (like AUX) without a phono preamp, the result would be disappointing—low volume and flat sound without the richness you expect from vinyl.
To hear music through your AUX input, you’ll need either an external phono preamp or a turntable with a built-in phono preamp.
Options for Connecting a Turntable Without a Phono Input
Here are the two ways to connect your turntable to your receiver via the AUX input.
Method 1: Using a Turntable with a Built-In Phono Preamp
Many modern turntables come with a built-in phono preamp, which simplifies the process. Here’s how to check if your turntable has this feature:
- Locate the Phono/Line Switch:
On the back of your turntable, look for a switch labeled “Phono” and “Line.” If your turntable has this switch, it means it has a built-in phono preamp.
- Set the Switch to Line:
If you are connecting to the AUX input, set the switch to “Line.” This activates the built-in phono preamp.
If you’re still not sure, take a look at the user manual or do a quick search for your turntable model online.
Once you’ve confirmed that your turntable has a built-in preamp, the next step is to connect it to the receiver. Here’s how you do it:
- Connect the RCA Cables:
Plug the RCA cables from your turntable into any available input on your receiver—AUX, CD, Tape, or anything similar.
These inputs are all designed for line-level signals, so they’ll work perfectly with your built-in preamp.
- Select the Input on the Receiver:
Once everything is connected, just select the corresponding input on your receiver. For example, if you’ve plugged your turntable into the AUX input, switch the receiver to AUX.
If you later upgrade to a receiver with a dedicated phono input, you can switch the setting back to “Phono” and use the dedicated input instead.
Method 2: Using an External Phono Preamp
If your turntable does not have a built-in phono preamp, you’ll need to purchase an external one. This device sits between your turntable and your receiver, amplifying the phono signal before it reaches the receiver.
Phono preamps cost from around $15 to several thousand dollars. If you are just getting into vinyl, a basic preamp will suffice.
Once you’ve purchased your external preamp, follow these steps to set it up:
- Connect the Turntable to the Preamp:
Start by plugging the RCA cables from your turntable into the input ports of the external preamp. Match the colors appropriately (red to red, white to white).
- Connect the Preamp to the Receiver:
Next, take a separate set of RCA cables and plug them into the output ports on the external preamp.
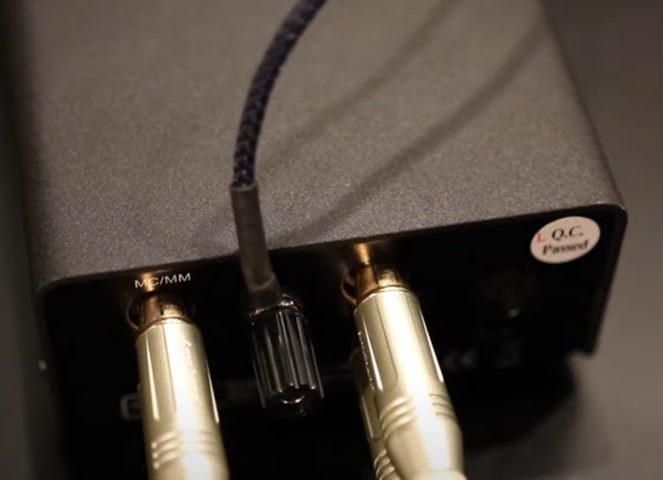
Connect the other ends to any line-level input on your receiver (like AUX, CD, or TAPE).
Make sure you’re not plugging it into the phono input—if your receiver happens to have one—because that would result in double amplification, and trust me, that’ll distort your sound.
Now, your turntable is properly connected. The preamp amplifies the signal from the turntable, allowing the AUX input to play your music.
Pros and Cons of Using the Built-In Phono Preamp Method
Pros:
- Easy Setup: No need for extra equipment—just plug your turntable directly into any line-level input on your receiver (AUX, CD, etc.), and you’re good to go.
- Convenience: Perfect for beginners or those who want a hassle-free experience. You don’t have to worry about buying or connecting an external preamp.
- Cost-Effective: You save money by not needing to purchase a separate phono preamp, making this a budget-friendly option.
- Quick Listening: Ideal for those who just want to get their vinyl playing without fuss. Turntables with built-in preamps are plug-and-play.
Cons:
- Limited Sound Quality: Built-in preamps, especially in budget turntables, might not offer the same high-quality sound as standalone preamps.
- Less Flexibility: You can’t upgrade the preamp separately. If you ever want to improve your sound quality, you’ll need to replace the entire turntable or buy an external preamp and bypass the internal one.
- Potential Signal Noise: Built-in preamps can sometimes add a slight hiss or hum to the audio, particularly at higher volumes
- No Customization: Since the preamp is built-in, you don’t get the opportunity to tweak settings for better audio performance.
Pros and Cons of Using External Phono Preamp Method
Pros:
- Superior Sound Quality: External preamps are designed with better components, making the clearer, richer sound.
- Flexibility: You can easily upgrade your external preamp over time without having to replace your turntable or receiver.
- Customization: Many external preamps offer adjustable settings, such as gain control and impedance matching, allowing you to fine-tune your audio setup for optimal performance.
- Future-Proofing: An external preamp can be used with different turntables and receivers, making it a long-term investment in your audio system.
Cons:
- Additional Cost: External preamps can be pricey, especially if you opt for high-end models.
- Extra Components: You’ll need to deal with an additional piece of equipment and more cables, which can make your setup more cluttered.
- More Setup Time: Setting up an external preamp requires more time and effort.
- Space Considerations: External preamps take up extra space, which may be a drawback for those who prefer a cleaner, more compact setup.
Additional Setup Considerations
So you’ve got your turntable connected to the receiver—whether through a built-in preamp or an external one—but there are a few extra things to keep in mind to ensure everything sounds as good as it should.
Here are some additional setup considerations to think about:
- Grounding Your Turntable: Connect the turntable’s ground wire to the ground terminal on your receiver or preamp to prevent unwanted hum and noise. If your equipment lacks a ground terminal, use a grounding block or ground loop isolator .
- Cable Quality and Selection: Use well-shielded, high-quality RCA cables to avoid signal degradation and reduce noise.
- Proper Turntable Placement: Place the turntable on a sturdy, level surface away from speakers to avoid vibrations that can cause noise or skipping.
- Tracking Force and Tonearm Calibration: Set the tracking force to the recommended weight using a tracking force gauge to prevent skipping and excessive wear.
- Cleaning and Maintenance: Clean your records with a carbon fiber brush before each plays to reduce pops and clicks.
Enjoy Your Vinyl Experience with Powered Phono Input!
Setting up your turntable correctly is crucial to getting the best sound out of your vinyl records.
You’ll need to ensure that your turntable is paired with the right amplification and equalization.
Whether you’re investing in a turntable with a built-in phono stage or purchasing a separate one, the key is to match the components correctly to enjoy your vinyl collection to the fullest.
